I recently replaced the cracked front glass screen on my iPhone 12 Pro. It was tricky, but doable. Let me walk you through the steps I followed for my iPhone 12 Pro screen replacement.
First up, you’ll need a few must-have supplies: an iPhone 12 Pro replacement screen, a small screwdriver set, plastic pry tools, a heat gun, adhesive strips, rubbing alcohol, tweezers, and safety glasses. Only use original Apple parts to ensure full compatibility.
Make sure to turn off your phone and disconnect it from any chargers before you start. Also, clear off a clean, clutter-free workspace and put on those safety glasses – broken glass is no joke!
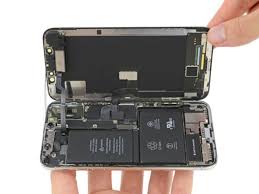
Okay, time to open up. Use your screwdriver to remove all the screws from the metal casing on the back of the phone. Set them aside separately, as they are different sizes. Once all the screws are out, slowly pry up the back cover. Be very gentle here.
Next, disconnect the battery to avoid any electrical hazards while working. Locate the connector cable and use your tweezers to gently detach it from the logic board.
Now for the cracked front glass. Use your heat gun to warm up the edges, which will soften the adhesive underneath. Start prying up a corner slowly with your plastic tools. Keep heating and prying bit-by-bit until the glass fully detaches.
Carefully clean away any leftover adhesive from the frame using alcohol and q-tips. Make sure no glass shards or debris are left behind before moving on.
The fun part – attaching the new screen! Lay down thin strips of strong adhesive around the frame. Gently lower the replacement screen into place, aligning it correctly. Press down firmly so the adhesive fully seals it.
Okay, we’re in the home stretch. Reconnect the battery, reattach the back cover with its screws, and power the phone back on to test the new screen. If it works – victory! You just saved yourself more money.
Be extremely careful when doing screen repairs – any mistakes can break the phone altogether. If you don’t feel up for an iPhone 12 Pro screen replacement, getting a professional is a safer bet. But with the right parts and patience, you can DIY it successfully. Good luck!
iPhone 12 Pro Screen Replacement: A Detailed Guide for Front Glass Repair
Categories:
Related Post

Bergen County’s Serene Landscaping SolutionsBergen County’s Serene Landscaping Solutions
Are you presently looking for a method to convert your outdoor space right into a gorgeous and useful haven? Landscaping solutions is most likely the key to attaining the ideal

Employing Attention Levels 4: A Step-By-Phase TechniqueEmploying Attention Levels 4: A Step-By-Phase Technique
With regards to taking good care of our family members, it is recommended to understand the kinds of care and attention portions readily available. Care Degree 4 is in reality

Jili Free Play Extravaganza: Unlimited EntertainingJili Free Play Extravaganza: Unlimited Entertaining
Jilibet is considered the most well-liked online video clip gaming site throughout the world. It really is a trustworthy and honest foundation that literally delivers you slots, shooting fish, on